Is Your GE Refrigerator Leaking Water? 5 Ways to Fix It Fast!
GE refrigerator users experience some common issues including water leakages. So, you’re not alone if you’re facing this as well. But what exactly causes a GE refrigerator to leak water out of nowhere?
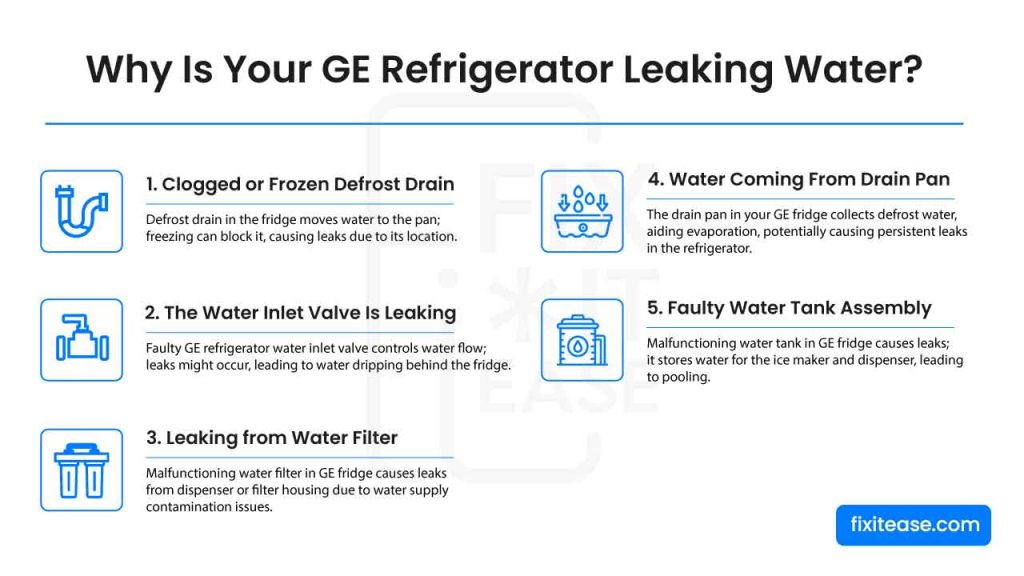
There could be some reasons for this issue including a clogged defrost drain, a leaked water inlet valve, a leakage from the water filter, a faulty water tank assembly, and so on. The solution isn’t the same for all of the issues and it requires individual steps.
Therefore, stick around to know how you can identify the common issues, fix them, and prevent them from happening in the future.
Why Is Your GE Refrigerator Leaking Water? – 5 Reasons With Fixes
Here we’ll be listing the biggest 5 reasons for a GE refrigerator leaking water and how you can fix them.
1. Clogged or Frozen Defrost Drain
The defrost drain transports residual water from the refrigerator’s defrost system to the drain pan. Since the drain is located behind the refrigerator’s rear interior wall and inside the freezer, water droplets can freeze inside the drain which leads to blockages and eventually causes leaks.
If you’ve noticed your GE refrigerator leaking water inside the freezer under the bottom basket, a clogged or frozen defrost drain might be the culprit.
What Causes It:
- Debris and food particles: Over time, small particles can accumulate within the drain, obstructing the flow of water.
- Ice accumulation: In cold environments, water inside the drain can freeze and block the passage.
- Improper Use of the Refrigerator: Overloading the refrigerator or arranging items to obstruct the drain can cause it to clog. Ensure that there’s adequate space for air circulation within the freezer.
- Malfunctioning Defrost System: In some cases, a malfunctioning defrost system within the refrigerator can lead to excessive ice build-up in the drain, resulting in blockages. This can result from a faulty defrost timer, heater, or thermostat.
How to Fix It:
1. Thawing the ice: If you suspect the defrost drain is frozen, you’ll need to thaw the ice. Here’s how:
- Mix a solution of 2 cups of hot tap water with 1 tablespoon of baking soda.
- Empty the refrigerator and locate the drain, usually situated in the centre of the rear wall. You may need to remove a rear freezer panel to access it on some models.
- Use a turkey baster to flush the drain with the warm baking soda solution.
The sound of water running into the drain pan beneath the refrigerator will indicate that the clog is successfully cleared!
2. Removing blockages: If the issue is due to debris or food particles, follow these steps:
- Locate the drain, which is typically at the bottom of your refrigerator unit.
- Examine the drain to determine if it’s blocked or frozen.
- If it’s blocked, turn off your refrigerator at the wall and allow the ice to thaw out.
- Once thawed, flush the drain with hot soapy water to ensure no remaining blockages.
- Turn your fridge back on at the wall and observe it over the next 24 hours to see if the problem is resolved.
How to Prevent It:
- Regularly inspect the defrost drain for obstructions and signs of ice accumulation.
- Make sure to clean up any food residue to prevent debris from reaching the drain.
2. The Water Inlet Valve Is Leaking
The water inlet valve in your GE refrigerator controls the flow of water from your home’s water supply to various components in your fridge (For example, the ice maker and water dispenser).
When this valve is faulty, it can lead to water leaks, which might result in water dripping on the floor behind the refrigerator.
What Causes It:
- Sediment Buildup: One common reason for a water inlet valve to fail is the accumulation of sediment. Over time, mineral deposits and debris can clog the valve which prevents water from flowing properly.
- Damaged O-rings: The O-rings in the valve create a seal between the valve and the refrigerator. If these O-rings become damaged, it can lead to water leaks. In most cases, replacing the O-rings can resolve the issue.
How to Fix It:
1. Sediment Buildup: If the water inlet valve is clogged with sediment, you’ll need to replace it. Here’s how:
- Shut off the water supply to the refrigerator.
- Remove the old valve by disconnecting the water supply hose and unscrewing the mounting bracket.
- Unplug the wire harnesses and disconnect the water lines.
- Cut off a few inches from the ends of the water lines if they are weak or damaged.
- Reattach the water lines to the new valve, reconnect the wire harnesses, and secure the valve to the refrigerator.
- Reattach the water supply hose, check for leaks, and replace the rear panel.
2. Damaged O-Rings: To fix a water inlet valve leaking due to damaged O-rings:
- Shut off the water supply to the refrigerator.
- Remove the old O-rings and replace them with new ones.
- Turn the water back on, and monitor for leaks.
How to Prevent It:
- Regularly inspect the water inlet valve for signs of sediment buildup or damage.
- Maintain a clean and clutter-free area around the refrigerator to prevent damage to the water supply line or the valve.
3. Leaking from Water Filter
One common reason for water leaks in your GE refrigerator is a malfunctioning water filter.
These filters remove contaminants from your home’s water supply before it reaches your refrigerator’s water dispenser and ice maker. When your GE refrigerator is leaking water from the water dispenser or within the filter housing, it may be due to issues related to the water filter.
What Causes It:
- Clogged Filter: Over time, water filters can become clogged with contaminants, leading to leaks. Regularly replacing the filter every six months can prevent clogs. If you notice bad-tasting ice cubes or water with an odd smell, consider changing the filter sooner.
- Incorrect Installation: If the filter is not correctly installed, it can cause leaks inside the filter housing. Always consult your user manual for precise installation instructions specific to your refrigerator model.
- Damaged Filter: Examine the filter for visible signs of damage, such as cracks in the filter head or missing O-rings. A damaged filter should be replaced as soon as possible.
- Use of Wrong Filter: GE recommends using an OEM filter that matches your refrigerator’s model and brand for proper fit and function. Using generic filters may not result in a secure fit which can eventually lead to leaks.
How to Replace a Clogged Filter:
- Refer to your user manual to determine the filter’s location and removal process.
- Turn off the water supply to the refrigerator.
- Remove the old filter according to the instructions in your manual.
- Install a new OEM filter that matches your refrigerator’s make and model.
- Turn the water supply back on and check for leaks.
How to Prevent It:
- Regularly replace the water filter every six months or according to the recommendations in your user manual.
- Carefully follow the installation instructions provided in your user manual to ensure the filter is correctly installed.
- Prioritize using OEM filters specifically designed for your refrigerator to avoid compatibility issues and leaks.
4. Water Coming From Drain Pan
If you’re still grappling with water leaks in your GE refrigerator, the culprit might be the drain pan. This component collects residual water from the refrigerator’s defrost system, allowing it to gradually evaporate.
However, if the drain pan is damaged, with a crack or hole, it can cause water to escape from the bottom of the refrigerator before it has a chance to evaporate.
What Causes It:
- Damaged Drain Pan: Over time, the drain pan may develop cracks or holes, resulting in water leakage. These defects can allow water to escape before it has a chance to evaporate as intended.
How to Fix It:
- Inspect the Drain Pan: Unplug your refrigerator and move it away from the wall. Remove the rear panel to access the drain pan. Carefully examine the drain pan for any cracks, holes, or rusted-out areas.
- Replace the Drain Pan: If you discover that the water leak is indeed coming from the damaged drain pan, it will need to be replaced. It’s best to get professional help for this task as it may involve complex disassembly and reassembly.
How to Prevent It:
- Regularly inspect your refrigerator’s components for signs of wear and damage, including the drain pan, during routine maintenance.
- Follow manufacturer-recommended maintenance guidelines to ensure the optimal performance of your refrigerator and minimize the risk of issues like a leaking drain pan.
5. Faulty Water Tank Assembly
Another reason for the water leakage issues with your GE refrigerator could be a malfunctioning water tank assembly. The tank assembly is responsible for storing water used by the ice maker and water dispenser in your fridge. A faulty water tank assembly can lead to water pooling on your kitchen floor.
What Causes It:
- Cracked or Damaged Water Tank: One of the primary reasons for water tank assembly failure is the presence of cracks or damage. If the tank has cracks or other defects, it can lead to water leakage.
- Malfunctioning Water Inlet Valve: The water inlet valve controls the flow of water into the tank. If this valve isn’t functioning correctly, it can result in water leaking from the assembly.
How to Fix It:
- Inspect the Water Tank: Start by turning off your refrigerator at the wall and moving it away from the wall to access the back. The location of the water tank can vary based on the specific refrigerator model, so refer to your owner’s manual for guidance.
Thoroughly inspect the tank for any evidence of leaks. Keep in mind that the leaks might be quite small and challenging to spot. If you find any signs of damage, it’s recommended to replace the entire water tank assembly as they are difficult to repair.
- Check the Water Inlet Valve: If the water tank itself appears to be intact, the next step is to inspect the water inlet valve. If this valve isn’t functioning as it should, it can lead to water leakage from the assembly. Replace the water inlet valve if it’s found to be faulty.
- Replacing the Water Tank Assembly: To replace the water tank assembly, you’ll need to access the back panel of the refrigerator. This will allow you to disconnect the water line connections and remove the old assembly. Once you’ve removed the old assembly, installing the new one is a matter of reversing the steps.
How to Prevent It:
- Regularly inspect your refrigerator’s water tank assembly as part of routine maintenance to catch any signs of wear and damage early.
- Following your refrigerator’s manufacturer-recommended maintenance guidelines can help prevent issues like a malfunctioning water tank assembly and reduce the risk of water leaks.
FAQs
What do I do if my fridge is leaking water from the bottom?
If your fridge is leaking water from the bottom, start by checking the water supply lines, the drain pan, and the water tank for any visible issues. Inspect for leaks and make sure components are properly connected. If the problem persists, seek professional appliance repair to address the underlying cause.
Where is the defrost drain on a refrigerator?
The defrost drain in a refrigerator is typically located at the back of the freezer compartment, underneath the evaporator coils. It allows melted ice and frost to flow down into a drain pan near the compressor, where it evaporates. Cleaning the defrost drain involves removing debris and ice to prevent clogs and leaks.
Last Words
So yes, if you have a GE refrigerator leaking water, there are several potential causes and solutions to consider.
Check for issues with the defrost drain, water inlet valve, water filter, drain pan, or water tank assembly. Proper identification and addressing of the problem can prevent water leaks and maintain your fridge’s efficiency.
Regular maintenance and using OEM replacement parts can help keep your refrigerator in good working condition. If you can’t pinpoint the issue, get professional assistance to ensure your refrigerator stays leak-free and in top shape.