Why Is My GE Refrigerator Lights Not Working? Fix It Like a Pro!
The light bulb that comes on every time you open the refrigerator’s door is a regular 120-volt lightbulb. Necessary electric power transfers to the socket from the internal wiring in your refrigerator. There are times when the GE refrigerator light doesn’t work, why does it happen?
The most common reason is that the bulbs in your refrigerator have burnt out. Some other reasons also lead to this problem such as incorrect wattage, socket issues, a defective control board, and a defective light switch.
Let’s go through this article to know how you can fix the issues and prevent the situation from happening in the future.
Why Isn’t My GE Refrigerator Lights Not Working?
Here are the 5 most compelling reasons why your GE refrigerator might not work.
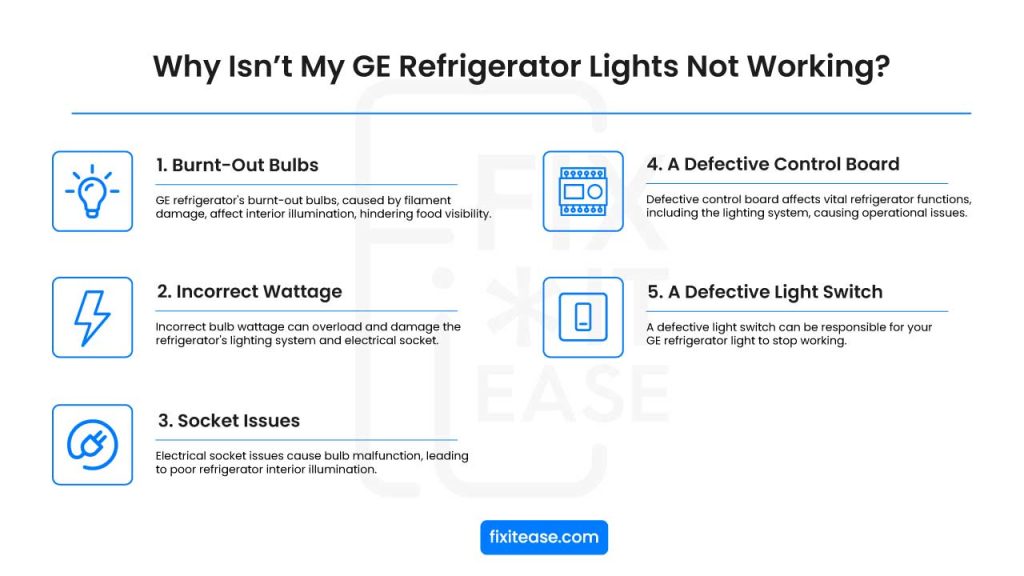
1. Burnt-Out Bulbs
Burnt-out bulbs refer to the light bulbs inside your GE refrigerator. The bulbs usually stop working due to filament damage or other issues. These bulbs are responsible for illuminating the interior of your refrigerator, making it easier to locate items and keep track of your food’s condition.
What Causes It:
- Natural Wear and Tear: Like any other light bulb, refrigerator bulbs have a limited lifespan. Over time, the filament in the bulb may wear out, leading to a burnt-out bulb.
- Frequent On/Off: Repeatedly opening and closing the refrigerator door can cause the bulbs to burn out more quickly, as frequent switching stresses the filament.
How to Identify Burnt-Out Bulbs
Identifying burnt-out bulbs is relatively straightforward. When you open your refrigerator door, check if the interior remains dark. If you don’t see any illumination, the bulb might be burnt out. Additionally, you may notice a broken filament inside the bulb when inspecting it visually.
How to Fix It:
To get rid of the issue, you need to replace the burnt-out bulbs with new bulbs. Here’s how you can do it:
- Locate the Bulb: Depending on your refrigerator model, the bulb may be found in various locations. Refer to your refrigerator’s user manual for specific instructions.
- Remove the Old Bulb: Carefully unscrew the burnt-out bulb counterclockwise. Use a gentle, but firm, grip to avoid breaking the bulb.
- Replace with a New Bulb: Ensure you use the correct type of bulb recommended by GE or specified in your refrigerator’s manual. Screw the new bulb in clockwise.
- Turn the Power Back On: Plug the refrigerator back in or turn the circuit breaker back on, and check if the new bulb is functioning correctly.
How to Prevent It:
- Handle with Care: Be gentle when opening and closing the refrigerator door to minimize frequent on/off cycles of the bulb.
- Regular Maintenance: Periodically inspect the bulbs to ensure they are in good condition. Replace them as soon as you notice any signs of wear or dimming.
- Avoid Slamming the Door: Be mindful not to slam the refrigerator door, as this can jolt the bulbs and shorten their lifespan.
2. Incorrect Wattage
An Incorrect wattage in a refrigerator can overload the electrical socket. When you use light bulbs with a wattage rating that is not suitable for your refrigerator, it can lead to bulb malfunction and ultimate damage to the refrigerator’s lighting system.
What Causes It:
- Using the Wrong Bulbs: One common cause of incorrect wattage is using bulbs with a higher or lower wattage rating than recommended by the refrigerator’s manufacturer.
- Unintentional Replacement: Sometimes, when replacing burnt-out bulbs, individuals may inadvertently select bulbs with the incorrect wattage.
How to Identify Incorrect Wattage of the Bulbs
- Checking the Bulb Rating: Inspect the bulbs to find the wattage rating, usually printed on the base or packaging. Compare this with the recommended wattage in your refrigerator’s user manual.
- Examining the Lighting System: If the bulbs are repeatedly burning out or flickering, it may be a sign of incorrect wattage. Dim or uneven lighting can also indicate this issue.
How to Fix It:
The fix for this issue is the same as the previous problem. You need to replace the bulbs with new ones that have the correct wattage rating as specified in the manual. To prevent the issue, you need to double-check the wattage and bulb type to ensure they match the manufacturer’s recommendations before purchasing new bulbs.
3. Socket Issues
When there’s something wrong with the electrical sockets, it can cause the bulbs to malfunction, resulting in a lack of interior illumination in your refrigerator.
What Causes It:
- Corrosion and Rust: Over time, electrical sockets can accumulate rust or corrosion and inhibit the flow of electricity to the bulbs.
- Loose Connections: The socket’s connections can become loose and disrupt the electrical circuit which prevents the bulbs from working correctly.
- Physical Damage: Physical damage to the sockets, such as bent or broken prongs, can cause connectivity problems and hinder proper bulb operation.
How to Identify Socket Issues
- Inspect for Corrosion: Examine the socket for signs of rust or corrosion, which may appear as discoloured or damaged metal.
- Check for Loose Connections: Gently wiggle the bulb in its socket. If it moves excessively or flickers when touched, this may indicate loose connections.
- Look for Physical Damage: Examine the socket and prongs for any visible damage, such as bent or broken parts.
How to Fix It:
- Clean the Socket: If you find corrosion, carefully clean the socket using a small wire brush, sandpaper, or a corrosion-removing solution. Ensure it’s completely dry before proceeding.
- Tighten Connections: If the socket has loose connections, gently tighten them using pliers or a small screwdriver. Be cautious not to overtighten and damage the socket further.
- Repair or Replace Damaged Sockets: If there’s physical damage to the socket, you may need to replace it. You can find replacement sockets at appliance parts stores or through the manufacturer.
How to Prevent It:
- Regular Maintenance: Periodically inspect the sockets for signs of corrosion or loose connections. Address any issues promptly.
- Use Bulbs with the Correct Wattage: Ensure that you use bulbs with the recommended wattage, as using bulbs with incorrect wattage can put additional strain on the sockets.
- Handle Bulbs Carefully: When changing bulbs, do so gently to avoid bending or breaking the prongs and stressing the sockets.
4. A Defective Control Board
A control board controls the most important functions in your refrigerator, including the lighting system. When the control board is defective, it can lead to issues with the operation of your refrigerator’s lights.
What Causes It:
- Electrical Surges: Power surges or electrical issues can damage the control board, rendering it defective.
- Manufacturing Defects: In some cases, control boards may have manufacturing defects that become apparent over time.
- Wear and Tear: Like any electronic component, control boards can deteriorate with age and extended use.
How to Identify A Defective Control Board
Determining if the control board is defective can be a bit more challenging and may require a professional diagnosis. Look for the following signs:
- Inconsistent Operation: If the lights behave erratically, turning on and off randomly or not at all, it may be a sign of a control board issue.
- Flickering or Dimming Lights: When the lights flicker or appear dim even with new bulbs, this could indicate a control board problem.
- Other Appliance Malfunctions: If other functions of the refrigerator, such as cooling or defrosting, are also affected, it may be related to the control board.
How to Fix It:
Repairing a defective control board is a complex task best left to trained technicians. Here’s what you can do:
- Contact GE Service: Reach out to GE customer service or a certified technician to diagnose and repair or replace the control board.
- Warranty Coverage: Check if your refrigerator is still under warranty, as the control board replacement may be covered, reducing the cost.
How to Prevent It:
- Surge Protection: Use surge protectors to safeguard your refrigerator and other appliances from electrical surges or fluctuations.
- Regular Maintenance: Maintain your refrigerator well by keeping it clean and addressing any issues promptly, which can help extend the life of the control board.
5. A Defective Light Switch
A defective light switch can be responsible for your GE refrigerator light to stop working.
What Causes It:
- Wear and Tear: Over time, the repeated use of the light switch can cause it to wear out or break.
- Mechanical Damage: Physical damage to the switch, such as impact or excessive force, can result in a defective light switch.
How to Identify A Defective Light Switch
- No Response: When you flip the switch on, the lights do not come on, or they come on sporadically.
- Loose or Wobbly Switch: If the switch feels loose, wobbly, or unresponsive when toggled, it may be a sign of a defective switch.
How to Fix It:
- Unplug the refrigerator: As a precaution, unplug the refrigerator or turn off the power at the circuit breaker to eliminate the risk of electrical shock.
- Remove the Old Switch: Carefully unscrew the defective light switch from its mounting. Disconnect any wires attached to it.
- Replace with a New Switch: Purchase a replacement light switch from an appliance parts store or through the manufacturer. Connect the wires to the new switch, securing them tightly. Screw the new switch into place.
- Turn the Power Back On: After replacing the switch, plug the refrigerator back in or turn the circuit breaker back on. Test the new switch to ensure it operates the lights correctly.
How to Prevent It:
- Gentle Operation: Be gentle when using the light switch. Avoid applying excessive force when toggling it.
- Regular Inspection: Periodically inspect the switch for signs of wear, damage, or loose connections. Address any issues promptly.
FAQs
What to do when my refrigerator light does not come on?
When your refrigerator light doesn’t come on, start with some basic troubleshooting. Check the power source, ensure the door switch is functioning, and replace any burnt-out bulbs with the correct wattage. If the issue remains, inspect the sockets and wiring for any signs of damage or corrosion.
If all else fails, there could be a defective control board or light switch. For complex issues, it’s best to consult a professional technician for a thorough diagnosis and repair.
How do you test a refrigerator light?
To test a refrigerator light, open the refrigerator door and locate the light switch button, often found near the door frame. Press and hold this button – if the light doesn’t come on, there might be an issue.
To rule out a burnt-out bulb, replace it with a new one. If the problem persists, it could be due to a faulty socket, control board, or wiring, which might require professional inspection and repair.
Wrapping Up
When your GE refrigerator lights are not working, there are several potential reasons to consider.
Burnt-out bulbs are a common and easily fixable problem. Incorrect wattage can be resolved by using the right bulbs. Socket issues may require cleaning or tightening. A defective control board or light switch might necessitate professional help. Regular maintenance, such as cleaning and gentle handling, can help prevent these issues.
Identify and address these problems effectively to ensure that the interior of your refrigerator remains well-lit, making it easier to find what you need and keeping your appliance in good working order.