Whirlpool Refrigerator Leaking Water? Fix It with This Easy Guide
If your Whirlpool refrigerator is leaking water, check for a cracked or damaged water supply line, make sure all tubing connections are secure, and ensure the water filter is installed correctly. Another possible cause of water leakage is a blocked drain hole located under the evaporator, which drains into the defrost pan under the machine.
Additionally, cracks or holes in the condenser fan can lead to pan leaks before the water has a chance to evaporate. It’s also important to check for a bent or broken drain pan, as this can cause water to leak onto the floor.
In this post, we will discuss all the necessary aspects of how to fix this problem using different methods. Let’s dive into them.
What Are The Most Common Causes Of Leaks In Whirlpool Refrigerators?
If you’re experiencing a Whirlpool refrigerator leaking water, there are a few common causes to check for. These include a cracked or damaged water supply line, an improperly installed or damaged water filter, or a blocked defrost drain. Checking these areas can help identify and fix the leaking issue.
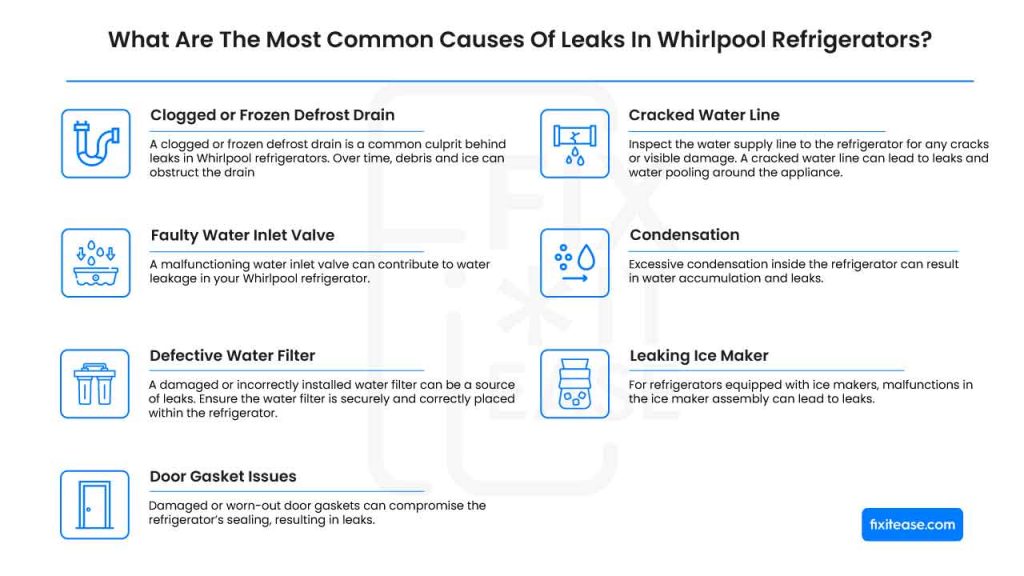
Clogged or Frozen Defrost Drain
A clogged or frozen defrost drain is a common culprit behind leaks in Whirlpool refrigerators. Over time, debris and ice can obstruct the drain, leading to water buildup and subsequent leakage. To address this issue, carefully inspect the defrost drain for any blockages and clear them away.
Using warm water or a mixture of water and vinegar can help melt away ice. Regularly cleaning the defrost drain prevents future clogs and ensures proper drainage.
Faulty Water Inlet Valve
A malfunctioning water inlet valve can contribute to water leakage in your Whirlpool refrigerator. Inspect the valve for any visible damage or signs of wear. If the valve is compromised, it may need replacement.
Before replacing the valve, ensure the water supply to the refrigerator is disconnected. Installing a new, properly functioning water inlet valve can resolve the issue and prevent further leaks.
Defective Water Filter
A damaged or incorrectly installed water filter can be a source of leaks. Ensure the water filter is securely and correctly placed within the refrigerator. If the filter is compromised, consider replacing it with a new one that is compatible with your Whirlpool model.
Regularly changing the water filter, as recommended by the manufacturer, maintains water quality and prevents potential leaks.
Cracked Water Line
Inspect the water supply line to the refrigerator for any cracks or visible damage. A cracked water line can lead to leaks and water pooling around the appliance.
If any issues are detected, replacing the damaged water line is essential. Use a high-quality, compatible replacement to ensure a secure and leak-free connection.
Condensation
Excessive condensation inside the refrigerator can result in water accumulation and leaks. To mitigate this issue, check and adjust the temperature settings to prevent condensation buildup.
Additionally, ensuring the refrigerator door is properly sealed helps maintain optimal conditions, reducing the likelihood of condensation-related leaks. Regularly wiping down surfaces inside the refrigerator can also manage excess moisture.
Leaking Ice Maker
For refrigerators equipped with ice makers, malfunctions in the ice maker assembly can lead to leaks. Carefully inspect the ice maker for any visible issues such as damaged components or misalignment.
Addressing these problems promptly can prevent water leaks and ensure the ice maker operates efficiently. Regular maintenance, such as cleaning and inspecting the ice maker, contributes to its proper functioning and reduces the risk of leaks.
Door Gasket Issues
Damaged or worn-out door gaskets can compromise the refrigerator’s sealing, resulting in leaks. Inspect the door gaskets for any signs of wear, tearing, or damage. If issues are detected, replacing the gaskets is crucial to maintaining a tight seal and preventing water leaks.
Properly functioning door gaskets not only prevent leaks but also contribute to energy efficiency by ensuring the refrigerator maintains consistent temperatures.
How Do You Perform a Refrigerator Initial Leak Assessment?
If you’re not a technical person. You can’t identify where the problem arises, But If you notice water on the floor or a leak in your Whirlpool refrigerator, first check for cracks or damage in the water supply line or tubing, as well as any issues with the water filter.
However, if you didn’t get any solution for a Whirlpool refrigerator that is leaking water, it is important to conduct an initial leak assessment to identify the source of the leak.
This will help you determine the appropriate steps to take in order to fix the problem.
1. Identifying The Leak Source
The first step in the initial leak assessment is to identify the source of the leak. This will help you determine the cause of the issue and whether it can be easily fixed or requires professional intervention.
Start by visually inspecting the refrigerator and the surrounding areas for signs of water leakage. Check the floor around the refrigerator for water puddles or wetness.
Look for any water stains, discoloration, or damage to the walls or cabinets near the refrigerator.
2. Checking Water Supply
Once you have identified the general area of the leak, the next step is to check the integrity of the water supply line. This line is responsible for delivering water to the refrigerator’s ice maker and water dispenser.
Inspect the water supply line for any cracks, damage, or signs of wear. Make sure the water supply line is securely connected at both ends, with no loose or leaking fittings. If you find any issues with the water supply line, it may need to be replaced or repaired.
3. Examining Tubing Connections
In addition to checking the water supply line, it is important to examine the tubing connections for security. The tubing connections are responsible for carrying water to different components of the refrigerator.
Inspect each tubing connection, including those leading to the ice maker and water dispenser, for any signs of leakage or looseness.
Tighten any loose fittings and ensure that all connections are secure. By conducting a thorough initial leak assessment and following these steps to identify the leak source, check water supply line integrity, and examine tubing connections for security, you can effectively troubleshoot and address the issue of water leaking from your Whirlpool refrigerator.
When The Water Filter Is To Blame?
If you notice your Whirlpool refrigerator leaking water, it may be due to a cracked or damaged water filter. Ensure that the water supply line and tubing are connected securely, and check for any cracks or damage.
One of the common causes of a Whirlpool refrigerator leaking water is a damaged or faulty water filter. Identifying water filter issues and ensuring proper installation methods are essential in preventing leaks and maintaining the efficient functioning of your refrigerator.
Water Filter Issues
To determine if the water filter is causing the leakage, here are some signs to look for:
Water dripping from the filter housing: Check if the water is coming from the area around the filter housing. If you notice any drips or puddles, it may indicate a problem with the filter or its installation.
Low water pressure or slow dispensing: If the water flow is weak or the dispenser takes longer than usual to fill a container, it could be due to a clogged or damaged filter.
Unusual taste or odor: If the filtered water tastes or smells different than usual, it might indicate a filter issue. This can occur if the filter is past its expiration date or if it has become contaminated.
Proper Installation Methods
Proper installation of the water filter is crucial to prevent leaks. Follow these steps to ensure correct installation:
- Locate the filter housing: This is usually situated in the refrigerator’s upper-right corner or the base grille.
- Turn off the water supply: Before you begin, shut off the water supply to avoid any water leakage during the installation.
- Remove the old filter: Twist the old filter counterclockwise to release it from the housing. Dispose of the old filter properly.
- Prepare the new filter: Remove any protective covering from the new filter and check if it matches the model recommended for your refrigerator.
- Install the new filter: Insert the new filter into the housing and rotate it clockwise until it locks into place. Make sure it is firmly seated.
- Flush the filter: Run a few gallons of water through the dispenser to flush out any air or impurities in the new filter.
- Check for leaks: Inspect the filter housing and connections for any signs of leakage. If you notice any leaks, turn off the water supply and repeat the installation steps.
Replacement Options For Damaged Filters
If a water filter is damaged or malfunctioning, it is important to replace it as soon as possible. Whirlpool offers a variety of replacement filters that are compatible with your refrigerator model, ensuring optimal performance. Here are some replacement options for damaged filters:
| Filter Type | Features |
| Whirlpool EveryDrop Filter | Advanced filtration technology to reduce contaminants and improve water quality. Easy installation and removal. |
| Whirlpool Inline Water Filter | Designed for refrigerators without a built-in water filter, this option connects directly to the water supply line. |
| Whirlpool PUR Filter | High-quality filtration to remove microorganisms, pharmaceuticals, and other impurities from your drinking water. |
Note: Refer to your refrigerator’s user manual or the Whirlpool website for specific instructions on replacing the water filter and choosing the right replacement option based on your model.
How Do You Solve Blocked Defrost Drain Solutions?
If you’re grappling with a Whirlpool refrigerator leaking water, a likely culprit could be a blocked defrost drain. This occurs when debris obstructs the drain, leading to water leakage onto the floor. Fear not, as there are straightforward solutions to clear these obstructions and prevent future leaks.
Locating The Defrost Drain Hole
To effectively tackle the blocked defrost drain, first, identify its position. In most Whirlpool refrigerators, the defrost drain hole is situated at the bottom back of the freezer, where blockages commonly occur, causing water puddles in the refrigerator compartment.
Safely clear the clogged defrost drain using these steps:
- Disconnect the refrigerator from the power source for safety.
- Empty the freezer contents and remove any hindering shelves or obstacles.
- Use a soft cloth or sponge to remove excess water or ice around the drain hole.
- Insert a thin, long implement like a pipe cleaner or turkey baster into the drain hole, gently dislodging any debris.
- Flush the drain hole with warm water to ensure complete clearing.
- Dry the area thoroughly, reassemble the freezer, and plug the refrigerator back in.
Preventative Maintenance Tips:
- Regularly check and clean the drain hole to prevent debris buildup, ideally every few months.
- Be cautious about the types of food near the drain area, avoiding items prone to falling or spilling.
- Keep the freezer door closed as much as possible to minimize frost accumulation and reduce the risk of a clogged drain.
- Consider installing a drain heater or tube extension kit to prevent ice formation in the drain hole.
Is There Any Issue With Drain Pan Solutions?
The drain pan in a refrigerator serves the crucial role of collecting and evaporating the defrosted water. However, issues may arise, leading to potential problems. If you notice water pooling around the refrigerator, it could indicate a problem with the drain pan.
Common problems include cracks, misalignment, or blockages in the drain line. To address these issues, inspect the drain pan for visible damage, ensure proper alignment, and clear any blockages in the drain line.
If the problem persists, seeking professional assistance may be necessary to prevent further damage and maintain the optimal functioning of your refrigerator. Regular inspection and cleaning can contribute to the prevention of drain pan-related problems.
How to Replace Faulty Water Inlet Valves?
Water inlet valves are responsible for regulating the flow of water into your home. If a water inlet valve is faulty, it can cause a number of problems, including:
- Low water pressure
- Leaks
- Flooding
To prevent these problems, it’s important to replace faulty water inlet valves as soon as possible. Here’s how to do it:
Turn off the water supply to your home. This can be done at the main water shut-off valve, which is usually located near your water meter.
Disconnect the water lines from the water inlet valves. There will be two water lines connected to each water inlet valve: a hot water line and a cold water line. Use a wrench to loosen the nuts that connect the water lines to the valves.
Remove the old water inlet valves. Once the water lines are disconnected, you can remove the old water inlet valves. Use a screwdriver to loosen the screws that hold the valves in place.
Install the new water inlet valves. Position the new water inlet valves over the openings in your home’s plumbing. Use a screwdriver to tighten the screws that hold the valves in place.
Reconnect the water lines to the new water inlet valves. Use a wrench to tighten the nuts that connect the water lines to the valves.
Turn on the water supply to your home. Check for leaks around the new water inlet valves. If you see any leaks, tighten the nuts that connect the water lines to the valves until the leaks stop.
Frequently Asked Questions For Whirlpool Refrigerator Leaking Water
Why Is My Whirlpool Refrigerator Leaking Water Out The Bottom?
A Whirlpool refrigerator may leak water out the bottom due to a cracked or damaged water supply line, loose or damaged water line behind the refrigerator, or a blocked defrost drain. Check the water supply line, tubing connections, and water filter for damage or improper installation.
If the issue persists, it may be a blocked defrost drain. Consider seeking professional assistance or refer to the manufacturer’s troubleshooting guide for further assistance.
What Causes A Refrigerator To Leak Water From The Bottom?
A clogged defrost drain is the most likely cause of a refrigerator leaking water from the bottom. The defrost drain prevents freezing by automatically defrosting the fridge and dripping water into a pan. Sometimes, debris can clog the drain, causing water to leak.
Where Is The Defrost Drain On A Whirlpool Refrigerator?
The defrost drain on a Whirlpool refrigerator is usually located at the bottom back of the freezer. It can become clogged with debris, leading to water puddling inside the refrigerator compartment.
Why Is My Whirlpool Refrigerator Water Dispenser Dripping?
If your Whirlpool refrigerator water dispenser is dripping, it may be due to air in the water system. Flushing the system is recommended after changing the filter or when the refrigerator is first installed. This can help prevent dripping at the dispenser or the formation of small/hollow ice cubes.
Conclusion
If you notice water leaking from your Whirlpool refrigerator, there are a few possible causes to consider. It could be a cracked or damaged water supply line, loose tubing connections, or a cracked or incorrectly installed water filter. Another common culprit is a blocked drain hole, which can lead to water accumulating and leaking onto the floor.
![8 Common GE Refrigerator Problems [With Expert Solutions]](https://fixitease.com/wp-content/uploads/2023/11/Common-GE-Refrigerator-Problems-768x432.jpg)