Frigidaire Refrigerator Leaking Water – 5 Causes and Fixes Guide
Witnessing your refrigerator to leak water is enough to make your day bad. But what can be the culprit? Why is your Frigidaire fridge is leaking water and being a river? What can you do about it?
A faulty water inlet valve, a leaky water filter, a damaged drain pan, a leaky water line, and a faulty ice maker can cause your Frigidaire refrigerator to leak water. The fix for each issue is different. Consult a technician if the damage of any part of your fridge is severe.
Read on to know the details about the reasons and fixes. We’ll also share you can prevent this issue in the future. So, don’t miss it!
Reasons Why Your Frigidaire Refrigerator Leaking Water
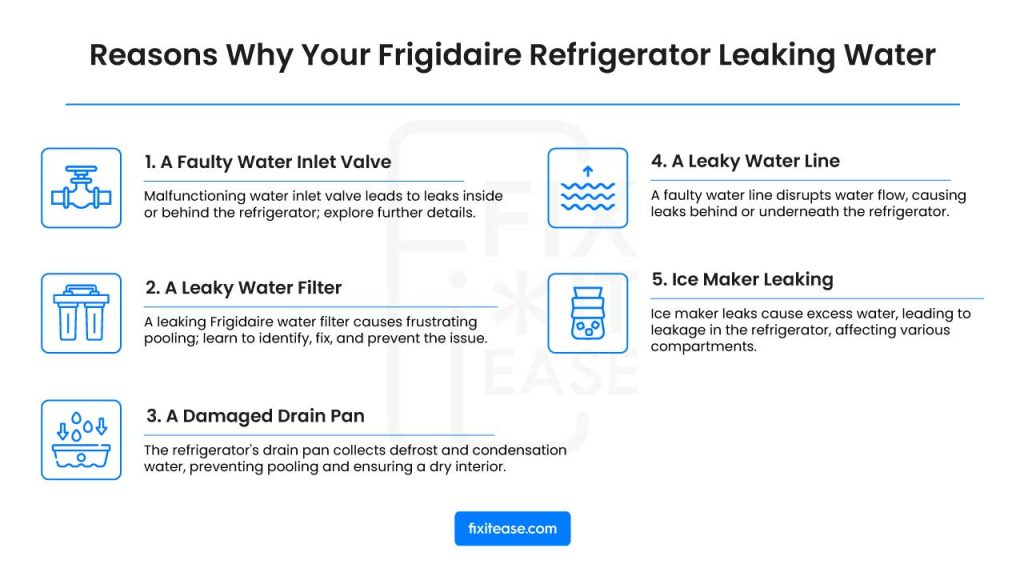
After spending hours in researching, we’ve found these five common reasons for a Frigidaire refrigerator to leak water. Let’s explore the reasons and fixes in a detailed manner.
1. A Faulty Water Inlet Valve
A water inlet valve is responsible for regulating the flow of water from your home’s supply line to the refrigerator’s dispenser and ice maker.
When this valve malfunctions, it can cause water to leak inside or behind your fridge. Let’s look into the details here.
What Causes It
- Loose Fitting: When the water inlet valve isn’t securely fastened to the main water supply line, it can lead to leaks. This can happen over time due to vibrations or movement of the refrigerator. If the valve isn’t tightly connected, water may escape from the connection point which can cause a leak.
- Cracks: Cracks in the valve body or its components can be another cause of malfunction. Over time, wear and tear, temperature fluctuations, or other stress factors can lead to cracks in the valve. These cracks can allow water to seep through, leading to leakage issues.
- Aging and Wear: Like any mechanical component, the water inlet valve may deteriorate over time. The wear and tear from regular use, especially in areas with hard water, can cause the valve to malfunction. If it’s not close properly, a continuous flow of water can result in leaks.
How to Identify
- Inspect Valve Placement: Start by moving the refrigerator away from the wall to access the water inlet valve. Ensure it is securely attached to the water line. If you notice it’s loose or not tightly connected, this might be the source of the problem.
- Check for Damage: Examine the water inlet valve for cracks or physical damage. If you see any, it’s a clear sign that the valve needs to be replaced.
- Leak Observation: Keep an eye on the valve when inspecting the water line. If you notice water dripping from the valve, it is likely malfunctioning and requires professional replacement.
How to Fix
First off, you can try to tighten the fittings. If this doesn’t solve the issue, replace the water inlet valve.
Tighten Fittings:
- Turn Off the Power: Before starting any work, unplug the refrigerator and turn off the water supply to ensure safety.
- Locate the Water Inlet Valve: Find the water inlet valve, typically situated at the back of the refrigerator. Check for any loose or poorly connected fittings between the valve and the water supply line. If you find a loose fitting, use an adjustable wrench or pliers to gently tighten it. Ensure that the connection is snug but avoid overtightening, as this can damage the components.
- Reconnect and Test: Once the fitting is tightened, reconnect the power and turn on the water supply. Test the refrigerator to see if the issue is resolved. Monitor for any signs of leakage. If the problem persists, proceed to the next step.
Replace the Valve:
- Locate the Water Inlet Valve: Find the location of the water inlet valve on your refrigerator. This is usually situated at the rear, accessible from the back of the appliance.
- Disconnect the Water Supply Line: Carefully disconnect the water supply line from the valve. Have a towel or bucket handy to catch any residual water.
- Remove the Old Valve: Depending on your refrigerator model, you may need to remove screws or clips holding the valve in place. Take note of their positions for reinstallation.
- Disconnect Electrical Connections: Detach the electrical connectors from the old valve. These connectors may vary based on your refrigerator’s design, so proceed with care.
- Install the New Valve: Replace the old valve with a compatible new one. Ensure it fits securely in the same position and reattach the electrical connectors. Reconnect the water supply line to the new valve, making sure it is tightly secured.
- Secure the Valve: Use the previously removed screws or clips to secure the valve in place. Plug in the refrigerator and turn on the water supply. Test the new valve for any signs of leakage. Monitor the appliance for a period to ensure the issue is resolved.
2. A Leaky Water Filter
A leaky Frigidaire water filter can be a frustrating issue, often resulting in water pooling in and around your refrigerator. In this section, we’ll delve into what a leaky water filter means, how to identify it, what causes this problem, how to fix it, and steps to prevent it.
What Causes It
1. Damaged or Misaligned Water Filter:
- Incorrect Installation: An improperly installed filter can lead to leaks. Refer to your user manual for precise installation instructions.
- Using an Aftermarket Filter: Substituting the original filter with an aftermarket one can result in leaks. Aftermarket filters may not perfectly match the specifications of your refrigerator, leading to improper fitting. OEM (Original Equipment Manufacturer) filters, like those offered by Frigidaire, are designed for a precise fit, preventing potential leaks.
- Damaged Components: Frequent use or moving the refrigerator can stress filter components, potentially causing cracks or chips in the filter head or housing. Inspect the filter and its housing, and replace any damaged parts.
2. Cracks in the Water Filter Housing: Cracks in the water filter housing are a significant concern as even the slightest crack can be the source of a leak.
These cracks can allow water to escape and not pass through the intended filtration process, resulting in leaks. It is imperative to replace the water filter housing to maintain a watertight seal and prevent any further leakage.
3. Missing or Torn Seal: If the seal of the water filter is missing or torn, it creates an opening where water can escape from the filtration system. The seal is crucial in ensuring a proper connection and preventing leaks.
4. Incorrect Filter Installation: When the water filter is not installed correctly, it can lead to leaks. An improper installation can create gaps and openings where water can escape. Following precise installation instructions from the user manual is a must to ensure a proper seal, preventing any water from leaking.
How to Identify
- Visible Leakage: The most apparent sign is water pooling beneath or around the water filter area. Check for wet spots or dripping water.
- Ice Maker Problems: Sometimes, water filter leaks can lead to ice maker malfunctions, such as undersized or misshapen ice cubes, which can be another indicator of a filter issue.
How to Fix It
Replace Damaged Components: If you find any cracks in the water filter housing or if the seal is missing or torn, you need to replace the damaged parts. For the water filter housing, you may need to follow these steps:
- Turn off the refrigerator and disconnect it from the power source for safety.
- Turn off the main water valve on the wall.
- Remove the back panel using a nut driver.
- Disconnect the water line from the fridge and the water inlet valve.
- Unscrew the nuts holding the water filter cover and remove it.
- Replace the damaged filter housing with a new one.
- Reassemble your fridge following the above procedure in reverse order.
How to Prevent It
- Proper Installation: Always follow the manufacturer’s instructions for installing the water filter. Ensure it is seated correctly and securely.
- Use OEM Filters: Stick with OEM (Original Equipment Manufacturer) filters provided by Frigidaire for your specific refrigerator model, as they are designed for a perfect fit.
3. A Damaged Drain Pan
A drain pan in a refrigerator collects water that results from the defrosting process and the condensation produced by the appliance. Essentially, the drain pan prevents excess water from pooling inside the refrigerator and redirects it to be safely evaporated, maintaining a dry and functional interior.
But when it gets damage, it create other issues including leaking water.
What Causes It
Understanding the underlying causes of a damaged drain pan is essential:
1. Cracks or Damage to the Pan:
- Dirty Drain Pan: If the drain pan is dirty and has a crack or damage, it can lead to dark-colored leaks. The accumulation of dirt and debris can initiate the issue. In such cases, the drain pan needs to be cleaned, and if damage is extensive, it should be replaced.
- Temperature Setting: A fridge set to an excessively low temperature can generate excessive condensation that may not evaporate efficiently. This can result in an overflowing drain pan, which can lead to leakage.
2. Overflowing Drain Pan:
- Inefficient Evaporation: Typically, the drain pan is designed to collect water that melts off the evaporator coils and should evaporate naturally. However, an overflowing drain pan can’t keep pace with the water generation, leading to leaks.
How to Identify
- Visible Damage: First, unplug your refrigerator for safety. Locate the drain pan, typically positioned at the bottom of the appliance. Inspect it carefully for any visible signs of cracks, dents, splits, or warping. If you notice any of these issues, the drain pan is damaged and requires attention.
- Dark-Colored Leaks: Leaks from a damaged drain pan often have a dark color due to the accumulation of dirt and debris. This can be another indicator of a damaged pan.
How to Fix It
- Manually Remove and Empty the Drain Pan: If you notice a dirty drain pan or if it’s overflowing, start by carefully pulling out the drain pan. Empty any water collected in it.
- Clean the Drain Pan: Use a kitchen sponge and water to thoroughly clean the drain pan. Remove dirt, debris, and any accumulated gunk to ensure it functions efficiently. A clean drain pan is less likely to cause leaks.
- Assess for Severe Damage: Examine the drain pan closely. If you find extensive damage such as cracks or warping, it may not be salvageable. In such cases, consider replacing the drain pan to resolve the issue effectively. Seek professional assistance if necessary.
How to Prevent It
- Maintain a moderate temperature setting for your refrigerator to reduce excessive condensation and prevent an overflowing drain pan.
- Regularly clean the drain pan to prevent the accumulation of dirt and debris, ensuring it functions effectively.
4. A Leaky Water Line
A leaky water line in your refrigerator can lead to water leaks because it disrupts the flow of water from your home’s water supply to the refrigerator’s dispenser and ice maker.
When the water line is compromised, water can escape, often pooling behind or underneath the refrigerator, resulting in leaks.
What Causes It
1. Damaged or Brittle Water Line: Over time, the plastic water lines that supply your refrigerator can become brittle. This aging can lead to cracks and holes in the line, causing water to escape.
2. Blocked Water Line: Blockages in the water line can cause leaks. If ice forms within the line, it can obstruct the flow of water. This not only leads to water leakage but can also affect the functioning of the ice machine and water dispenser.
3. Loose or Incorrect Connections: Incorrect or loose connections between the water line, supply valve, and inlet hose can result in leaks. Ensure that all connections are sufficiently tight and hoses are correctly inserted.
How to Identify
- Visible Water Accumulation: If you notice water pooling behind or underneath your refrigerator, it’s a clear sign of a potential water line issue.
- Inspect the Water Line: Move your refrigerator away from the wall to access the water line. Look for any dripping water or signs of moisture along the line. Additionally, check for loose connections and examine the plastic hose for tears or holes.
How to Fix It
For a Damaged or Brittle Water Line:
- Turn Off Refrigerator: Prioritize safety by turning off your refrigerator.
- Inspect the Water Line: Examine the water line for significant damage. If you find extensive cracks or holes, it’s essential to replace the damaged line. This task can often be completed by an electrician or appliance technician.
For a Blocked Water Line:
- Turn Off Refrigerator: To ensure safety while working on the appliance, switch off the refrigerator.
- Melt Ice Blockage: If the water line is blocked by ice, the solution is straightforward. Unplug the refrigerator and let it sit for approximately four hours to allow the ice to melt and clear the blockage.
For Loose or Incorrect Connections:
- Tighten Connections: Ensure that all connections, including the supply valve and inlet hose, are securely tightened. Loose connections can be a common cause of leaks.
- Replace the Water Line: If the water line is damaged beyond repair or if the issue persists, it may be necessary to replace the water line. Consult a professional technician or plumber for assistance.
How to Prevent It
- Regularly inspect and maintain your refrigerator’s water line, checking for signs of wear, damage, or blockages. Ensure that all connections are securely tightened and correctly installed.
5. Ice Maker Leaking
Ice maker leaks in a refrigerator contribute to water leakage by allowing excess water to escape from the ice maker and flow into areas where it shouldn’t.
When the ice maker overfills or ice jams within the unit, it can cause water to accumulate beyond its capacity. This excess water then spills out of the ice maker, flows into the freezer or other compartments, and eventually makes its way to the bottom of the refrigerator, resulting in water leakage.
What Causes It and how to Identify
- Ice Jam or Overfill: An ice jam or overfilling of the ice maker can lead to excess water that spills out. If you notice your ice maker overfilling or ice jamming within the unit, it can lead to leaks.
- Uneven Refrigerator Level: If your fridge is not level, it can cause water to flow where it shouldn’t. Check if your refrigerator is standing level.
- Misaligned Fill Valve and Ice Fill Cup: When the ice maker’s components are not correctly aligned, it can result in leaks. Improper alignment of the fill valve and ice fill cup can result in leaks. Make sure they are correctly positioned.
- Clogged Defrost Drain Line: It can create water buildup in the freezer, which may be mistaken for an ice maker leak. A clogged defrost drain line may be misdiagnosed as an ice maker leak. This can cause water buildup in the freezer and result in water leakage.
- Faulty or Leaking Water Supply Components: Loose or damaged water supply components, including pipes and connections, can cause water to escape and appear as an ice maker leak.
How to Fix It
- Ice Jam or Overfill: Place a large bowl beneath the ice maker to catch any residual water. Pour a cup of warm water down the chute and wait a few seconds, then test the dispenser. Repeat as necessary.
- Misaligned Fill Valve and Ice Fill Cup: Use a bubble or laser level reader to check alignment and refasten components properly.
- Clogged Defrost Drain Line: If the fill valve or fill cup appears misaligned, realign them. For a clogged defrost drain line, pour hot (not boiling) water over it to melt ice, then remove any debris.
- Faulty or Leaking Water Supply Components: Inspect the water supply line for kinks, damage, or punctures. Replace it if necessary, or have a technician do so.
FAQs
Why is my fridge freezer leaking water?
Your fridge freezer may be leaking water for a few reasons. One common cause is a blocked or clogged defrost drain. When this drain gets obstructed, water from the defrost cycle has nowhere to go, leading to leaks.
Another possibility is a malfunctioning ice maker, which can overfill or cause ice jams, allowing water to escape. It’s also worth checking for damaged water lines or connections.
Where is the water coming from in the bottom of my refrigerator?
If you’re finding water at the bottom of your refrigerator, there are a few possible sources. It might be due to a clogged or blocked defrost drain, causing water from the defrost cycle to accumulate. Leaky water lines, damaged drain pans, or a malfunctioning ice maker can also contribute to this issue.
Wrapping Up
Now, you know why a Frigidaire refrigerator can leak water and what the possible fixes are. We’ve explored several potential reasons, such as damaged water filters, cracked drain pans, leaky water lines, and ice maker problems.
By identifying the root cause and following the appropriate steps, you can prevent further leakage and maintain your refrigerator’s efficiency. Regular maintenance and prompt attention to these issues can keep your kitchen dry and your fridge in good working order.
A dry kitchen is a happy kitchen!

